
Brussels sprouts are often misunderstood, but when paired with crispy bacon and garlic, they transform into a delightful side dish. This recipe elevates the humble sprout with rich flavors and a satisfying crunch. Perfect for adding a touch of elegance to any meal, these crispy garlic bacon Brussels sprouts might just become your new favorite way to enjoy veggies.
Steps
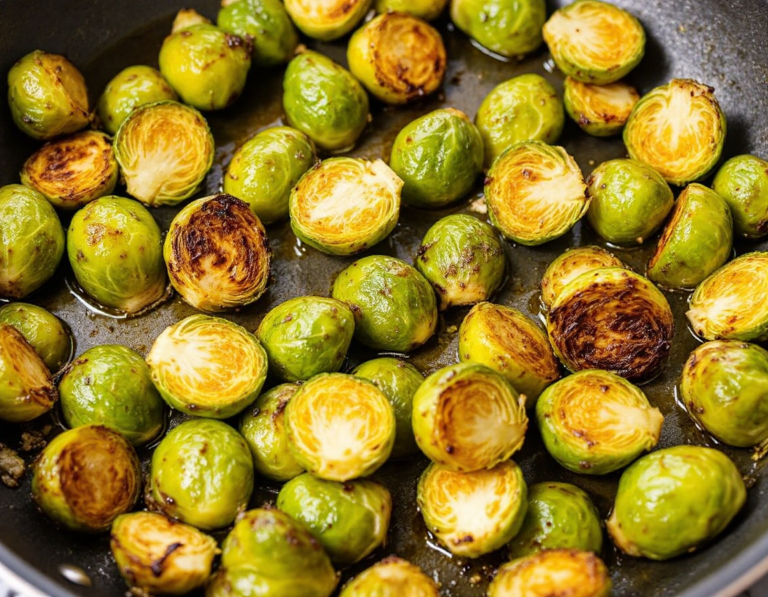
- Heat a large, sturdy skillet over medium-high heat for about four minutes and then add olive oil. Once the oil is hot and begins to shine, add the halved Brussels sprouts with the cut side facing down. Let them cook undisturbed for 5 to 8 minutes until they are deeply caramelized.
- Season the Brussels sprouts with salt and pepper, then stir them using a wooden spoon. Continue cooking, stirring occasionally, until the sprouts are evenly browned and tender inside, which should take another 6 to 8 minutes.
- Remove the skillet from the heat and mix in the balsamic vinegar. If using nuts, add them to the pan and allow the heat from the skillet to toast them, stirring frequently. Once the nuts are toasted, transfer the Brussels sprouts to a serving dish and garnish with fresh herbs if desired.
- Serve the sautéed Brussels sprouts hot. Optionally, you can enhance the dish by adding a handful of Parmesan, feta, or goat cheese before serving.
Ingredients
- 1 pound Brussels sprouts, trimmed and halved
- 2 tablespoons extra virgin olive oil
- ½ teaspoon kosher salt
- ¼ teaspoon ground black pepper
- 1 tablespoon balsamic vinegar or lemon juice
- 1 to 2 tablespoons raw pine nuts or chopped raw walnuts, almonds, or pecans (optional)
- Chopped fresh herbs like parsley, cilantro, or mint (optional)
- A handful of Parmesan, feta, or goat cheese (optional)
Nutritional Values
Calories: 456kcal | Carbohydrates: 44g | Protein: 16g | Fat: 28g | Saturated Fat: 4g | Potassium: 1764mg | Fiber: 16g | Sugar: 12g | Vitamin A: 3420IU | Vitamin C: 384mg | Calcium: 192mg | Iron: 8mg
FAQ
- What is the best method to cook Brussels sprouts quickly?
- Sautéing Brussels sprouts on the stovetop is a quick and efficient method. This technique results in sprouts that are crispy on the outside and tender on the inside, and it only takes about 10 minutes to prepare.
- How can I add more flavor to sautéed Brussels sprouts?
- To enhance the flavor, you can add a splash of acid such as balsamic vinegar or lemon juice. Additionally, incorporating nuts like pine nuts or walnuts and cheese such as Parmesan can elevate the dish.
- What is the difference between sautéed and roasted Brussels sprouts?
- Sautéed Brussels sprouts tend to have a firmer texture compared to roasted ones, which are usually softer throughout. Both methods give a deliciously crispy and caramelized exterior but differ slightly in interior texture.
- Can I freeze sautéed Brussels sprouts?
- While you can freeze them, it’s not recommended as they tend to become soggy. If you choose to freeze, ensure they are stored in an airtight container and thawed overnight in the refrigerator before reheating.
- What are some serving suggestions for sautéed Brussels sprouts?
- Sautéed Brussels sprouts pair well with dishes like pork chops, chicken, pasta, or salmon, making them a versatile side for various meals.
Tips
- Ensure High Heat for Caramelization: To achieve that irresistible crispy and caramelized exterior, cook the Brussels sprouts over medium-high heat without disturbing them initially. This allows them to develop a rich, golden sear.
- Incorporate a Splash of Acid: Adding a touch of balsamic vinegar or lemon juice towards the end of cooking enhances the flavor by balancing the sprouts’ natural bitterness and adding a refreshing zing.
- Consider Optional Add-ins for Texture and Flavor: Enhance your dish with a handful of toasted nuts, such as pine nuts or almonds, and sprinkle some fresh herbs or cheese like Parmesan for extra flavor and texture.
- Avoid Freezing for Best Texture: While you can freeze cooked Brussels sprouts, be aware that they may become soggy. For the best texture, store them in the refrigerator and enjoy them within a few days.
Equipment
- Cast iron skillet or a similar heavy-bottomed skillet.
- Cutting board (preferably a no-slip cutting board).